How to Set Up Domain Authentication in TouchBasePro
Authenticate your sending domain in TouchBasePro to protect your brand identity and improve email deliverability by adding the required DNS records.
If you use your own domain name to send emails, it's important to have email authentication. It's like a digital signature for your domain that helps protect your brand, identity, content, and reputation. It makes it difficult for others to pretend to send emails on your behalf and can help increase your overall email deliverability when sending from TouchBasePro.
If you haven't authenticated your sending domain with DKIM, some email clients will flag your emails as coming from a different server. This can potentially cause them to be blocked, or lead subscribers to believe they're receiving spam.
Setting up email authentication is a technical process and requires access to systems outside of the TouchBasePro system, like your DNS. If terms like TXT records, CNAME records, TTL settings, and public-private keys aren't familiar to you, ask someone in your IT team to help you.
How to set up domain authentication:
You can set up your own email authentication from within your TouchBasePro account.
You can follow the below steps:
Log in to your TouchBasePro account
Select the Account & Settings tab on menu bar on the left-hand side
Select Domains & Tracking
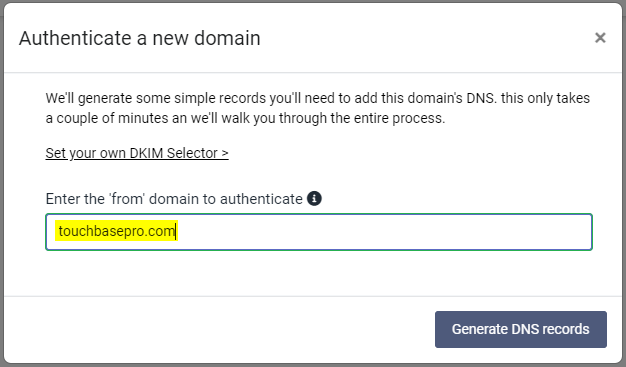
Click on the button Add a domain
Enter your sending domain that you would like to authenticate and select Generate DNS records
Click on your sending domain to get your set up instructions
Follow the instructions on the set-up page or select the Email instructions option to easily share these records with your DNS host.
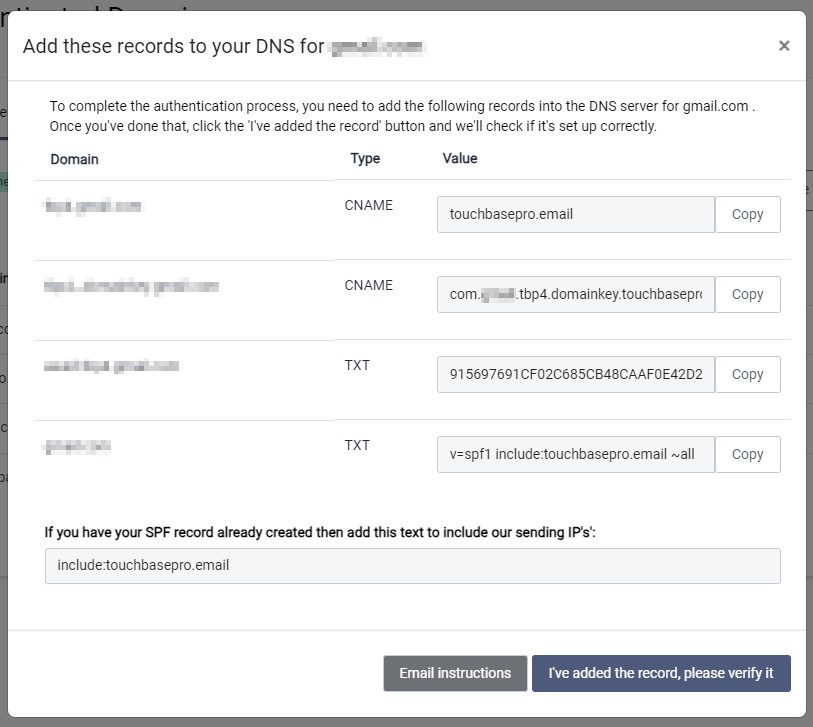
Once these records have been added to your DNS you can select verify option and our system will check if your records were added correctly.
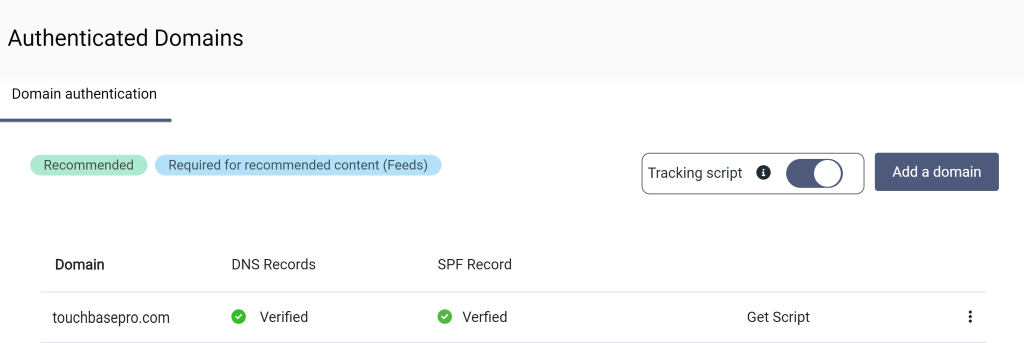
Once your domain has been authenticated it will look like this:
For additional information and assistance, please contact our support team on support@touchbasepro.com
Frequently asked questions
- Why do I need to authenticate my sending domain?
- Domain authentication acts as a digital signature for your domain. It helps protect your brand, identity, content, and reputation, makes it difficult for others to send emails on your behalf, and can help increase your overall email deliverability when sending from TouchBasePro.
- What happens if I don't authenticate my domain with DKIM?
- If you haven't authenticated your sending domain with DKIM, some email clients will flag your emails as coming from a different server. This can potentially cause them to be blocked, or lead subscribers to believe they're receiving spam.
- Where in TouchBasePro do I go to authenticate my domain?
- Log in to your TouchBasePro account, select the Account and Settings tab on the menu bar on the left-hand side, then select Domains and Tracking. From there, click Add a domain to begin the process.
- How do I confirm my domain has been authenticated successfully?
- Once the DNS records have been added, select the verify option and the system will check if your records were added correctly. A verified domain will display confirmed SPF and DNS record statuses on the Authenticated Domains screen.